

What to Expect During Your NH Stamped Concrete Installation
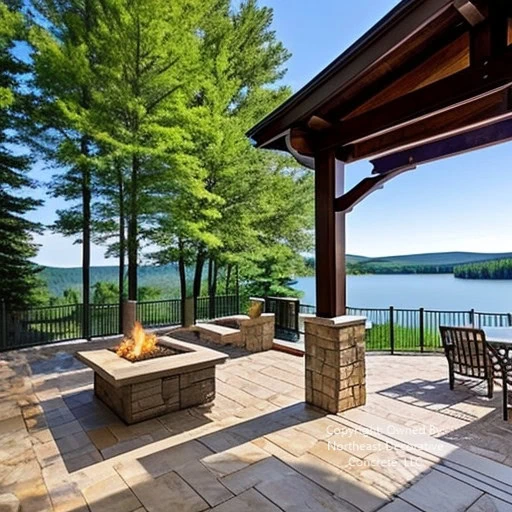
Stamped concrete turns ordinary slabs into art. It mimics stone, wood, and brick at a fraction of the cost. If you’re a homeowner in New Hampshire and want to build a patio or driveway, this has tips to avoid pitfalls.
Step 1: Concrete Contractor Site Preparation
What Happens: Your contractor will dig the frost line, clear debris, and compact the soil to create a stable base. Proper drainage is critical in NH’s snowy winters, so expect a slight slope (usually ¼” per foot) to direct water away from your home.
Pro Tip:
Always check for underground utilities before digging. Hitting a gas line costs more than a few extra minutes of planning!
Key Takeaway: A good subgrade prevents cracks and makes stamped concrete last for 25 years or more.

Step 2: Building Forms & Adding Reinforcement
What Happens: Wooden or metal forms outline your project’s shape. Steel rebar or wire mesh strengthens the concrete needed in freeze-thaw-prone New Hampshire.
Real-Life Example: In Groton, MA, a homeowner skipped reinforcement on their driveway. After one winter, hairline cracks appeared. Reinforcing costs 10–15% more upfront but saves thousands in repairs.
| Reinforcement Options | Best Use Case |
|---|---|
| Rebar | Driveways, heavy traffic areas |
| Fiber mesh | Patios, walkways |
| Wire mesh | Pool decks, curved designs |
Step 3: Pouring & Leveling the Concrete Patios
Workers pour concrete into forms and level it with a screed. Timing is critical—NH’s humidity affects how fast the concrete sets. Most crews work in the early morning to avoid the midday heat.
Pro Tip:
Ask for a ‘stiff mix’ concrete (low water content). It holds stamp patterns better and reduces pitting.
A poorly leveled slab results in the formation of puddles. NH contractors often use laser guides for precision.
Step 4: Adding Color & Texture to Stamped Concrete Patio
What Happens: We add color using:
-
Integral pigments: Mixed into the concrete for a uniform color.
-
Color hardeners: Sprinkled on top for bold, fade-resistant hues.
| Popular NH Stamped Patterns | Ideal For |
|---|---|
| Cobblestone | Colonial-style homes |
| Slate | Modern patios |
| Wood plank | Rustic pool decks |
| Herringbone | Driveways |
Step 5: Stamping the Decorative Concrete Design
What Happens: The concrete will be firm about 4-6 hours after the pour. Then, rubber stamps are pressed into the surface. Contractors use release agents (powder or liquid) to prevent sticking.
Pro Tip:
Avoid walking on stamped concrete for 24–48 hours. Even a slight dent can ruin the pattern.
Key Takeaway: Stamps must achieve perfect alignment. Ask to see your contractor’s portfolio—mismatched patterns are a red flag.
Step 6: Cutting Stamped Patio Control Joints
Workers cut joints into the concrete to control cracking. In NH, builders space joints every 8–12 feet, and these joints account for 25% of the slab’s thickness.
Real-Life Mistake: A Deerfield, NH homeowner skipped joints on their 20-foot patio. Temperature shifts throughout the year caused unsightly cracks to appear.
Step 7: Curing & Sealing
What Happens: Concrete cures for 7–28 days. A sealant protects against NH’s harsh winters and road salt.
| Sealer Types | Pros | Cons |
|---|---|---|
| Acrylic | Affordable, easy to apply | Reapply yearly |
| Polyurethane | Durable, UV-resistant | Higher cost |
| Penetrating | Low maintenance | Less glossy finish |
Key Takeaway: Reseal every 3–5 years. Unsealed concrete quickly absorbs maple sap or grill grease.
Step 8: Final Inspection & Maintenance
What Happens: Your contractor will check for defects and provide care instructions.
Pro Tip:
Use safe CMA tpye ice melt—never rock salt. Salt corrodes concrete and fades colors.
Maintenance Checklist:
-
Sweep weekly to prevent dirt buildup.
-
Pressure wash annually.
-
Fix cracks ASAP with concrete caulk.
How Long Does It Take From Start To Finish
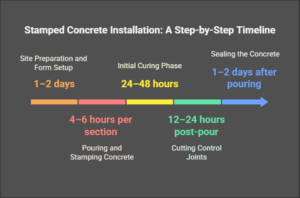
Installing stamped concrete requires careful timing. It combines artistry with the concrete’s hardening nature. Here’s a timeline, factoring in key steps like curing and the weather:
Typical Stamped Concrete Driveway and Patio Installation Timeline
The process takes 1–2 weeks, depending on size, weather, and designs. It includes excavation to sealing. Here’s how it breaks down:
| Phase | Time Required | Key Details |
|---|---|---|
| 1. Site Prep & Forms | 1–2 days | Excavation, grading, and form setup (longer for slopes or drainage needs) |
| 2. Pouring & Stamping | 4–6 hours per section | Concrete must be stamped within 1–4 hours of pouring before it hardens |
| 3. Initial Cure | 24–48 hours | No foot traffic allowed until fully set |
| 4. Cutting Joints | 12–24 hours post-pour | Prevents random cracking; timing depends on temperature |
| 5. Sealing | 1–2 after pouring | Requires complete curing (7–28 days) to avoid sealing in moisture |
Key Factors Affecting New Concrete Timeline
-
Weather:
-
Cold or humid conditions slow curing. Ideal temperatures: 60–80°F.
-
Rain delays workers from pouring and stamping, as they can’t work with wet concrete.
-
-
Project Size:
-
A small patio (150 sq. ft.) might take 2–3 days.
-
Large driveways or complex designs (e.g., multi-color patterns) add 1–2 weeks.
-
-
Sealer Drying:
-
Acrylic sealers dry in 2–4 hours for foot traffic.
-
Polyurethane sealers take 24–48 hours.
-
Real-Life Example
A Canterbury, NH, homeowner’s 1,200 Sq. Ft. patio took 7 days total:
-
Days 1–2: Excavation, gravel base, and form setup.
-
Day 3: Concrete was poured and stamped in six hours.
-
Days 4–5: Curing.
-
Day 5: Control joints cut.
-
Days 6–7: Sealing.
Pro Tip:
Schedule pours for early mornings in summer. The heat accelerates drying, leaving less time for stamping.
Most New Hampshire stamped concrete walkway projects finish in 1-2 weeks with few delays. This is due to planning for the weather and hiring skilled contractors.
Why Hire a Pro? The Milford NH Driveway Disaster
A DIYer in Milford, NH, tried stamping their driveway paver without experience. The result? A mismatched pattern, uneven coloring, and $6,000 in repair costs. Licensed contractors carry insurance and warranties—worth the investment for multi-decade results.
Final Thoughts
NH-stamped concrete is both beautiful and strong. Proper installation is crucial for its natural stone appeal. By following the 8-step process and working with a pro, you’ll get a stunning surface that will withstand Nor’easters and look great year-round.
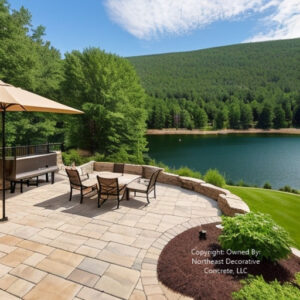
Looking for inspiration? See our gallery of NH projects. They feature cobblestone driveways and wood-look patios that will make your neighbors jealous!
Frequently Asked Questions:
Q: How does NH’s freeze-thaw cycle impact reinforcement choices?
A: Use ASTM A615 Grade 60 steel rebar in driveways. It prevents cracking from thermal expansion. Fiber mesh lacks tensile strength for sub-20°F cycles.
Q: What’s the “stampability window” in NH’s humidity?
A: Concrete must reach 500–700 psi compressive strength (4–6 hours post-pour) for stamping. High humidity extends this window; low humidity narrows it to 2–3 hours.
Q: Why are control joints spaced at 1.5 times slab thickness?
A: For a 4″ slab, cut joints every 6–8 feet. This will force cracks along predetermined lines. It avoids random splitting from NH’s ±50°F seasonal swings.
Q: Do release agents hinder concrete surface sealing?
Yes, powdered release leaves residue. It requires pH-neutral cleaning to prevent concrete sealer failure (ASTM D3359 standards).
Q: Can epoxy-modified outdoor space sealers withstand NH road salt?
A: Polyurethane sealers (3.5 mil thick) outperform acrylics. They resist chloride ion penetration from de-icers by 70% (ASTM C672 testing).
Bonus: NH’s coastal zones require 5,000 PSI long-lasting concrete with 6% air to resist saltwater.
Our Locations:
Nashua, NH
North Hampton, NH
Concord, NH